- Home
- Accessing the Securitas Healthcare Community Portal
Accessing Securitas Healthcare's Community Portal
Accessing the Community Portal
Whether you are a returning user or new to the platform, the login page provides two primary paths:
Required Information: You will typically be asked to provide your professional contact details, including your facility name, country, and role, to ensure your account is linked to the correct customer profile.
1. Existing Users
If you already have credentials, enter your registered Email Address and Password in the login fields.
Forgot Password: If you cannot remember your credentials, use the "Forgot Password" link to receive a reset email.
2. New Users (Create a New Login)
If you do not have an account, you must register to gain access to protected resources.
Self-Registration: Locate the "Not a Member" button on the login page.
Community Portal Features and Tools
Once logged in, the dashboard provides a comprehensive suite of self-service tools designed to streamline your operations:
- Support Tickets: Create, track, and manage technical support cases. You can view real-time updates from Securitas engineers regarding your open inquiries.
- Returns (RMA): Initiate and monitor the status of Return Material Authorizations for hardware that requires repair or replacement.
- License Center: Manage your software licenses, view activation keys, and track expiration dates for your various healthcare solutions.
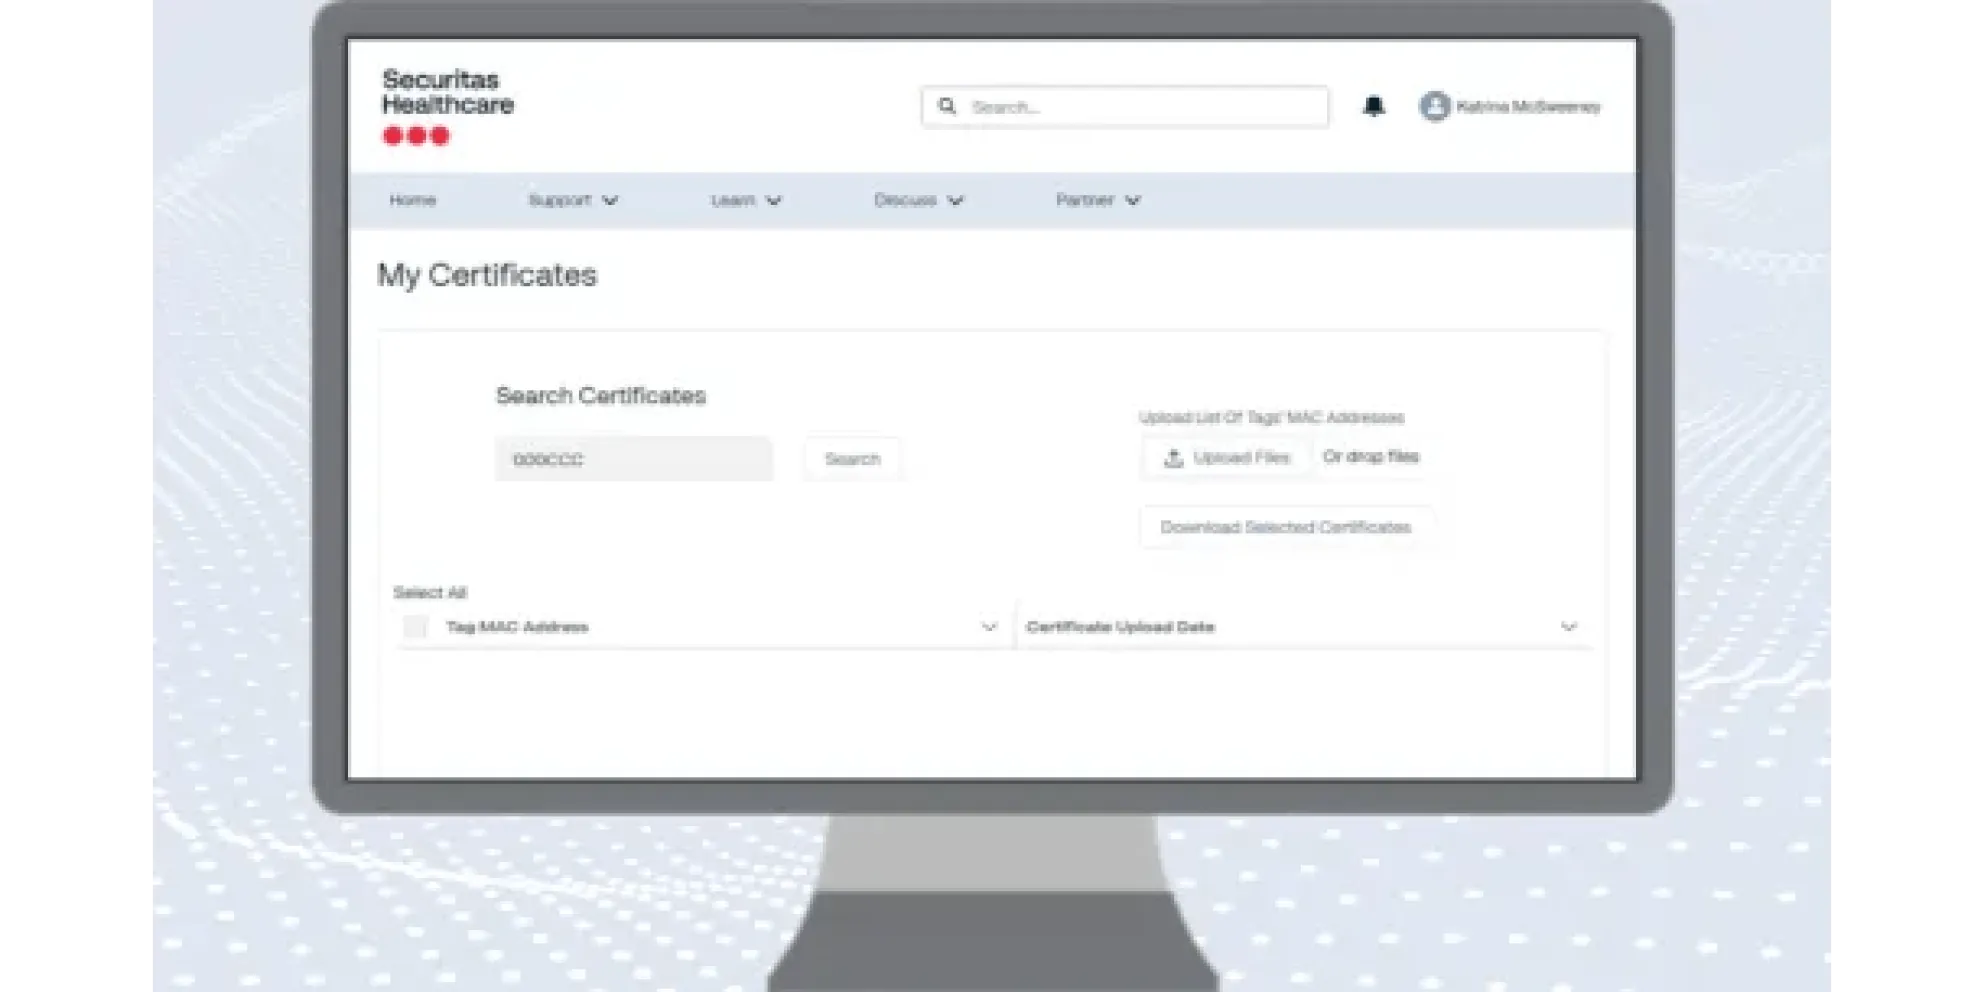
- Calibration Certificates: Access and download official calibration records for your devices to ensure regulatory and clinical compliance.
- Knowledge/Downloads: A robust library containing user manuals, technical data sheets, whitepapers, and the latest software firmware/updates.
- Mobile Apps: Find information and download links for Securitas Healthcare’s suite of mobile applications, such as those used for Real-Time Location Systems (RTLS) or event notifications.
Opening a Technical Support Ticket
To open a technical support ticket in the Securitas Healthcare Community Support Portal, follow these steps once you have successfully logged in.
1. Access the Tickets Module
From the portal home dashboard, click on the Tickets icon or select "Tickets" from the top navigation menu. This will take you to your personal ticket management area.
2. Initiate a New Request
Look for a button labeled "New", "Create Ticket", or "Submit a Request". Clicking this will open a digital intake form.
3. Complete the Ticket Form
To ensure a fast resolution, provide as much detail as possible in the following fields:
- Subject: A brief, descriptive summary of the issue (e.g., "AeroScout Tag not checking in").
- Product/Solution: Select the specific system you are using (e.g., Arial, Hugs, MobileView).
- Priority/Severity: Choose the level of urgency based on the impact on your clinical operations.
- Description: Detail the specific problem, any error codes displayed, and the steps you have already taken to troubleshoot.
4. Submit and Track
Click Submit. You will immediately receive a Ticket Number.
Managing Your Tickets
After submission, you can return to the Tickets section at any time to:
- Check Status: See if your ticket is "New," "In Progress," or "Awaiting Customer Response."
- Add Comments: Provide additional information or respond to questions from the support engineer.
- View History: Access a record of all your past resolved tickets for future reference.
- Pro Tip: For critical, system-down emergencies, it is recommended to call the Technical Support line at +1-866-845-7680 immediately after submitting your ticket to ensure priority routing.
Step-by-Step: Initiating a Return (RMA)
To initiate a Return (RMA) for hardware repairs or replacements within the Securitas Healthcare Community Support Portal, follow the process outlined below.
Note: Ensure all biohazardous materials are cleaned and decontaminated according to hospital policy before shipping healthcare hardware.
1. Access the Returns Module
From the portal homepage, click on the Returns or RMA icon. This area is specifically designed to handle hardware logistics, separate from general technical inquiries.
2. Start a New RMA Request
Click the "Create New RMA" or "New Return" button. You will be prompted to fill out a structured form that identifies the hardware in question.
Start with the subject and description lines providing as much detail as possible to help us understand the issue and provide the right resolution.
3. Provide Product Identification
- Serial Number/MAC Address: Enter the unique identifier for the device (e.g., the barcode on an AeroScout Tag or Hugs transmitter). The system often validates this to check warranty status.
- Part Number: If known, specify the model or part number of the equipment.
- Quantity: Indicate how many units of this specific type you are returning.
4. Detail the Issue and Shipping
- Reason for Return: Select from a dropdown (e.g., Physical Damage, Battery Failure, Connectivity Issue) and provide a brief description of the fault.
- Shipping/Contact Info: Verify the return shipping address where the repaired or replaced unit should be sent.
- Reference Number: You may add an internal Purchase Order (PO) or tracking number if required by your facility's procurement department.
5. Review and Submit
Review the details for accuracy and click Submit.
Post-Submission: Next Steps
Once the request is submitted, the system will process the RMA and provide the following:
- RMA Number: This is your official tracking number for the return.
- Shipping Instructions: You will receive instructions on how to package the device and where to ship it (e.g., to the Securitas service center in Lincoln, NE, or another regional hub).
- RMA Label: In most cases, a PDF packing slip will be generated. You must print this and include it inside the box to ensure the service team can identify your equipment upon arrival.
Note: Ensure all biohazardous materials are cleaned and decontaminated according to hospital policy before shipping healthcare hardware.
Step-by-Step: Downloading Calibration Certificates
Accessing Calibration Certificates (specifically for NIST-traceable tags like the T15 or T5 environmental monitoring series) is a key feature of the Community Support Portal to help your facility maintain regulatory compliance.
1. Locate the Calibration Section
Once logged into the Securitas Healthcare Community Support Portal, find and click the Calibration Certificates icon on your dashboard. This module is specifically built for searching and organizing NIST certificates in one centralized location.
2. Search for Your Device
The portal allows you to pull certificates for individual devices or batches of hardware. You can typically search using:
- MAC Address: The unique identifier printed on the device label.
- Tag ID/Serial Number: The specific identification number for your environmental monitoring tag.
3. Filter by Date
If you have been using the system for several years, you may see multiple certificates for a single device. Use the date filters to select the most recent certificate or the one corresponding to a specific audit period.
4. Download and Save
Individual Download: Click the download icon (usually a PDF symbol) next to the specific device record.
Batch Download: If you are preparing for a Joint Commission or health department audit, look for a "Select All" or "Export" feature to download certificates for your entire fleet of tags at once.
Alternative Management: MobileView
If your facility uses MobileView, these digital certificates are often automatically linked to your assets:
- Log in to your MobileView application.
- Search for the specific asset (e.g., "Pharmacy Fridge 1").
- Open the Asset Details screen.
- Look for the Attachments or NIST Certificate tab to view the certificate directly within the monitoring software.
Why This Matters for Audits
Compliance: NIST-traceable certificates prove that your sensors are accurately measuring temperature and humidity within required margins.
Proactive Alerts: The portal can often be configured to send Renewal Email Notifications, alerting you when tags are nearing their expiration date so you can order freshly calibrated replacements before a lapse occurs.
Easily Access and Manage Your NIST Calibration Certificates
Looking for a faster way to find and organize your NIST certificates? Our self-service portal (login required) makes it easy to search, download, and organize your NIST calibration certificate for your T15 and T5 environmental monitoring tags—all in one centralized location. You can also save certificates within your MobileView system in the assets details screen for simplified management and organization. Access it below using your community portal login credentials.